
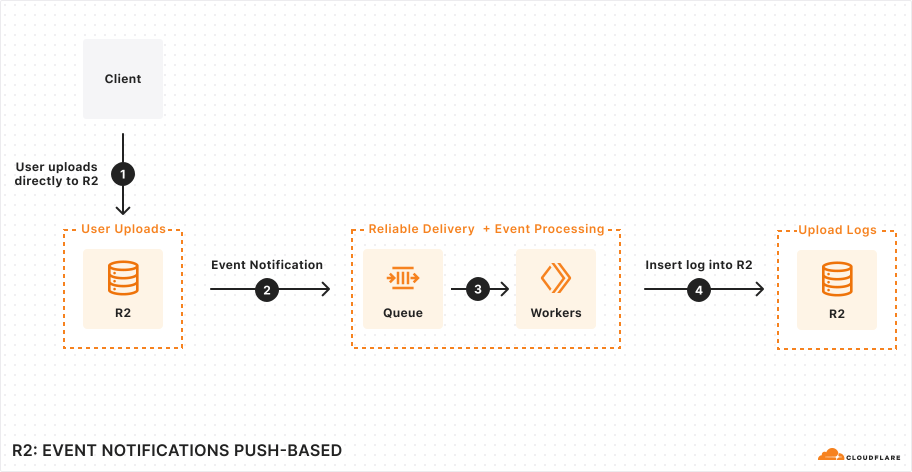
本示例提供分步指南,说明如何使用事件通知 捕获 R2 上传日志并将其存储在单独的存储桶中。
首先,请参阅安装/更新 Wrangler 安装 Wrangler(Cloudflare 开发者平台 CLI)。
您需要创建两个 R2 存储桶:
example-upload-bucket:当新对象上传到此存储桶时,您的消费者 Worker 将写入日志。example-log-sink-bucket:来自example-upload-bucket的上传日志将写入此存储桶。
要创建存储桶,请运行以下 Wrangler 命令:
npx wrangler r2 bucket create example-upload-bucket
npx wrangler r2 bucket create example-log-sink-bucket事件通知捕获 example-upload-bucket 中数据的变更。您需要创建新队列来接收通知:
npx wrangler queues create example-event-notification-queue在启用 example-upload-bucket 的事件通知之前,您需要创建消费者 Worker 来接收通知。
使用 C3(create-cloudflare CLI)创建新 Worker。C3 是一个命令行工具,旨在帮助您设置和部署新应用程序(包括 Workers)到 Cloudflare。
npm create cloudflare@latest -- consumer-workeryarn create cloudflare consumer-workerpnpm create cloudflare@latest consumer-worker进行设置时,请选择以下选项:
- 对于 What would you like to start with?,选择
Hello World example。 - 对于 Which template would you like to use?,选择
Worker only。 - 对于 Which language do you want to use?,选择
TypeScript。 - 对于 Do you want to use git for version control?,选择
Yes。 - 对于 Do you want to deploy your application?,选择
No(部署前我们还会做一些修改)。
然后,进入新创建的目录:
cd consumer-worker在 Worker 项目的 [Wrangler 配置文件](/workers/wrangler/configuration/) 中,添加队列消费者和 R2 存储桶绑定。队列消费者绑定将您的 Worker 注册为未来事件通知的消费者,R2 存储桶绑定允许 Worker 访问 R2 存储桶。
{
	"$schema": "./node_modules/wrangler/config-schema.json",
	"name": "event-notification-writer",
	"main": "src/index.ts",
	// Set this to today's date
	"compatibility_date": "2026-08-17",
	"compatibility_flags": [
		"nodejs_compat"
	],
	"queues": {
		"consumers": [
			{
				"queue": "example-event-notification-queue",
				"max_batch_size": 100,
				"max_batch_timeout": 5
			}
		]
	},
	"r2_buckets": [
		{
			"binding": "LOG_SINK",
			"bucket_name": "example-log-sink-bucket"
		}
	]
}
"$schema" = "./node_modules/wrangler/config-schema.json"
name = "event-notification-writer"
main = "src/index.ts"
# Set this to today's date
compatibility_date = "2026-08-17"
compatibility_flags = [ "nodejs_compat" ]
[[queues.consumers]]
queue = "example-event-notification-queue"
max_batch_size = 100
max_batch_timeout = 5
[[r2_buckets]]
binding = "LOG_SINK"
bucket_name = "example-log-sink-bucket"向 src/index.ts 添加 queue 处理程序 以处理将通知批次写入日志接收存储桶(您不需要 fetch 处理程序):
export interface Env {
	LOG_SINK: R2Bucket;
}

export default {
	async queue(batch, env): Promise<void> {
		const batchId = new Date().toISOString().replace(/[:.]/g, "-");
		const fileName = `upload-logs-${batchId}.json`;

		// Serialize the entire batch of messages to JSON
		const fileContent = new TextEncoder().encode(
			JSON.stringify(batch.messages),
		);

		// Write the batch of messages to R2
		await env.LOG_SINK.put(fileName, fileContent, {
			httpMetadata: {
				contentType: "application/json",
			},
		});
	},
} satisfies ExportedHandler<Env>;要部署消费者 Worker,请运行 wrangler deploy 命令:
npx wrangler deploy现在消费者 Worker 已准备好处理传入的事件通知消息,需要使用 wrangler r2 bucket notification create 命令 为 example-upload-bucket 启用事件通知:
npx wrangler r2 bucket notification create example-upload-bucket --event-type object-create --queue example-event-notification-queue现在您可以通过在 Cloudflare 仪表板中向 example-upload-bucket 上传对象来测试完整的端到端流程。上传对象后,日志将在几秒后出现在 example-log-sink-bucket 中。