
在本教程中,你将使用 HTML、CSS 和 JavaScript 构建待办事项列表应用。应用数据将存储在 Workers KV 中。
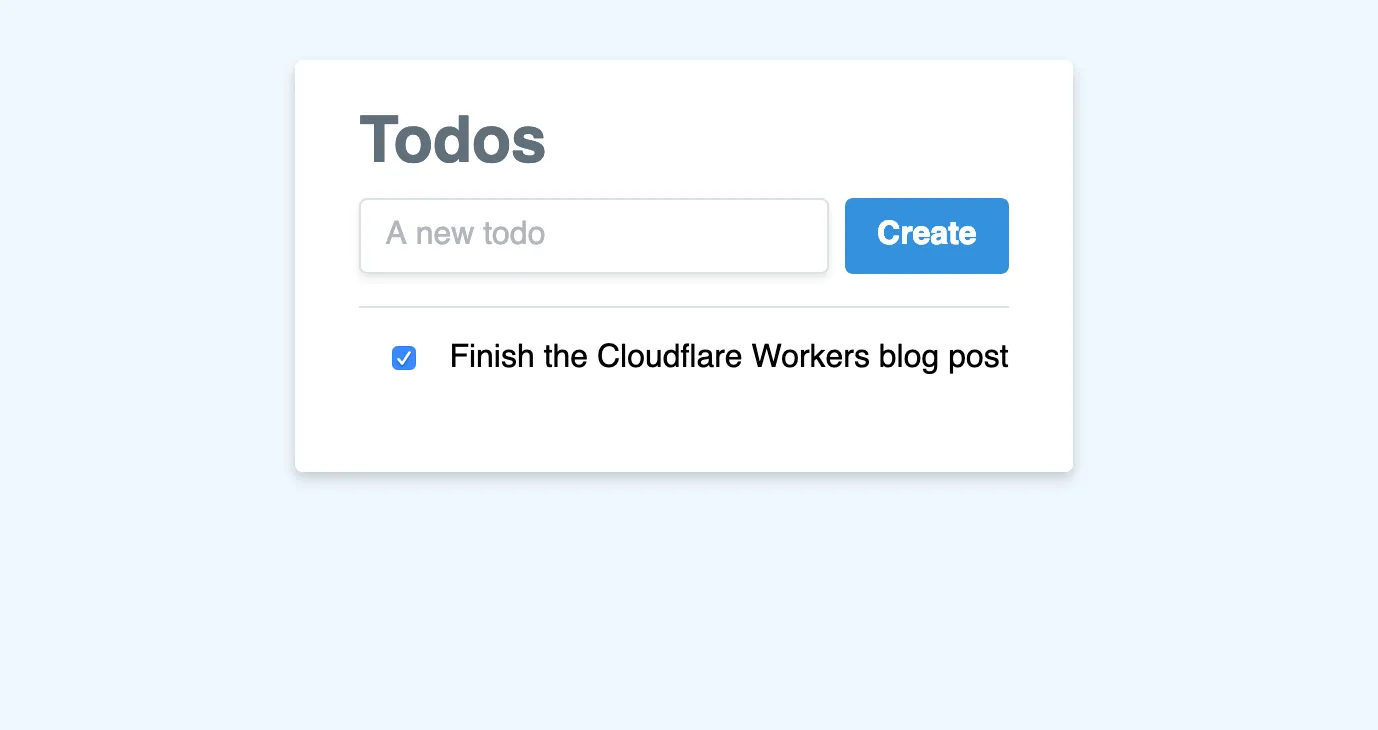
开始本项目之前,你应该具备 HTML、CSS 和 JavaScript 的基础经验。你将学习:
- 使用 Workers 构建如何让你专注于编写代码并交付成品。
- 添加 Workers KV 如何使本教程成为构建完整数据驱动应用的绝佳入门。
如果想查看本项目的完整代码,请参阅 GitHub 上的项目 ↗ 并参考在线演示 ↗了解你将构建的内容。
所有教程都假设你已经完成了快速入门指南,该指南帮助你设置 Cloudflare Workers 账户、C3 ↗ 和 Wrangler。
首先,使用 create-cloudflare ↗ CLI 工具创建名为 todos 的新 Cloudflare Workers 项目。在本教程中,你将使用默认的 Hello World 模板创建 Workers 项目。
npm create cloudflare@latest -- todosyarn create cloudflare todospnpm create cloudflare@latest todos进行设置时,请选择以下选项:
- 对于 What would you like to start with?,选择
Hello World example。 - 对于 Which template would you like to use?,选择
Worker only。 - 对于 Which language do you want to use?,选择
JavaScript。 - 对于 Do you want to use git for version control?,选择
Yes。 - 对于 Do you want to deploy your application?,选择
No(部署前我们还会做一些修改)。
进入新创建的目录:
cd todos在新的 todos Worker 项目目录中,index.js 代表 Cloudflare Workers 应用的入口点。
所有传入 Workers 的 HTTP 请求都会作为 request 对象传递给 fetch() 处理程序。Worker 收到请求后,应用构建的响应将返回给用户。本教程将引导你了解请求/响应模式的工作原理,以及如何使用它构建功能完整的应用。
export default {
	async fetch(request, env, ctx) {
		return new Response("Hello World!");
	},
};
在默认的 index.js 文件中,你可以看到请求/响应模式的实际应用。fetch 构造一个正文为 'Hello World!' 的新 Response。
当 Worker 收到 request 时,Worker 将新构造的响应返回给客户端。你的 Worker 将直接从 Cloudflare 全球网络 ↗ 提供新响应,而不是继续转发到源服务器。标准服务器接受请求并返回响应。Cloudflare Workers 允许你通过在 Cloudflare 全球网络上直接构造响应来回复。
部署到 Cloudflare Workers 的任何项目都可以使用现代 JavaScript 工具,如 ES modules、npm 包和 async/await ↗ 函数来构建应用。除了编写 Workers,你还可以使用 Workers 构建完整应用,使用与本教程相同的工具和流程。
在本教程中,你将构建一个在 Workers 上运行的待办事项列表应用,允许从 KV 存储读取数据并使用数据填充 HTML 响应发送给客户端。
创建此应用的工作分为三个任务:
- 将数据写入 KV。
- 从 KV 渲染数据。
- 从应用 UI 添加待办事项。
在本教程的剩余部分,你将完成每个任务,迭代应用,然后发布到你自己的域名。
首先,你需要了解如何用实际数据填充待办事项列表。为此,使用 Cloudflare Workers KV——一种键值存储,你可以在 Worker 内部访问以读写数据。
要开始使用 KV,设置一个 namespace。所有缓存数据都将存储在该 namespace 中,通过配置,你可以在 Worker 中使用预定义变量访问该 namespace。使用 Wrangler 通过 kv namespace create 命令 创建名为 TODOS 的新 namespace,并在终端运行以下命令获取关联的 namespace ID:
npx wrangler kv namespace create "TODOS" --preview关联的 namespace 可以与 --preview 标志结合使用,以与预览 namespace 而非生产 namespace 交互。namespace 可以通过在 Wrangler 配置中定义来添加到应用。复制新创建的 namespace ID,并在 Wrangler 配置文件 中定义 kv_namespaces 键以设置 namespace:
{
	"kv_namespaces": [
		{
			"binding": "TODOS",
			"id": "<YOUR_ID>",
			"preview_id": "<YOUR_PREVIEW_ID>"
		}
	]
}[[kv_namespaces]]
binding = "TODOS"
id = "<YOUR_ID>"
preview_id = "<YOUR_PREVIEW_ID>"定义的 namespace TODOS 现在在代码库中可用。接下来,了解 KV API。KV namespace 有三个主要方法用于与缓存交互:get、put 和 delete。
通过定义初始数据集开始存储数据,你将使用 put 方法将其放入缓存。以下示例定义 defaultData 对象而非待办事项数组。你可能希望稍后在此缓存对象中存储元数据和其他信息。给定该数据对象,使用 JSON.stringify 将字符串添加到缓存:
export default {
	async fetch(request, env, ctx) {
		const defaultData = {
			todos: [
				{
					id: 1,
					name: "Finish the Cloudflare Workers blog post",
					completed: false,
				},
			],
		};
		await env.TODOS.put("data", JSON.stringify(defaultData));
		return new Response("Hello World!");
	},
};
Workers KV 是最终一致的全局数据存储。区域内的写入会立即在该区域内反映,但不会立即在其他区域可用。但是,这些写入最终会在所有地方可用,届时 Workers KV 保证每个区域内的数据一致。
给定缓存中存在数据以及缓存最终一致的假设,此代码需要稍作调整:应用应检查缓存并使用其值(如果键存在)。如果不存在,暂时使用 defaultData 作为数据源(将来应设置)并将其写入缓存以供将来使用。将代码拆分为几个函数以简化后,结果如下:
export default {
	async fetch(request, env, ctx) {
		const defaultData = {
			todos: [
				{
					id: 1,
					name: "Finish the Cloudflare Workers blog post",
					completed: false,
				},
			],
		};
		const setCache = (data) => env.TODOS.put("data", data);
		const getCache = () => env.TODOS.get("data");

		let data;

		const cache = await getCache();
		if (!cache) {
			await setCache(JSON.stringify(defaultData));
			data = defaultData;
		} else {
			data = JSON.parse(cache);
		}

		return new Response(JSON.stringify(data));
	},
};代码中存在数据(应用的缓存数据对象)后,应获取此数据并在用户界面中渲染。
为此,在 Workers 脚本中创建新的 html 变量,并用它构建静态 HTML 模板以服务客户端。在 fetch 中,构造带有 Content-Type: text/html 头的新 Response 并服务给客户端:
const html = `<!DOCTYPE html>
<html>
  <head>
    <meta charset="UTF-8" />
    <meta name="viewport" content="width=device-width,initial-scale=1" />
    <title>Todos</title>
  </head>
  <body>
    <h1>Todos</h1>
  </body>
</html>
`;

async fetch (request, env, ctx) {
  // previous code
  return new Response(html, {
      headers: {
        'Content-Type': 'text/html'
      }
    });
}
你有一个正在渲染的静态 HTML 站点,可以开始用数据填充它。在 body 中,添加 id 为 todos 的 div 标签:
const html = `<!DOCTYPE html>
<html>
  <head>
    <meta charset="UTF-8" />
    <meta name="viewport" content="width=device-width,initial-scale=1" />
    <title>Todos</title>
  </head>
  <body>
    <h1>Todos</h1>
    <div id="todos"></div>
  </body>
</html>
`;
在 body 内容末尾添加 <script> 元素,接收 todos 数组。对于数组中的每个 todo,创建 div 元素并将其附加到 todos HTML 元素:
const html = `<!DOCTYPE html>
<html>
  <head>
    <meta charset="UTF-8" />
    <meta name="viewport" content="width=device-width,initial-scale=1" />
    <title>Todos</title>
  </head>
  <body>
    <h1>Todos</h1>
    <div id="todos"></div>
  </body>
  <script>
    window.todos = []
    var todoContainer = document.querySelector("#todos")
    window.todos.forEach(todo => {
      var el = document.createElement("div")
      el.textContent = todo.name
      todoContainer.appendChild(el)
    })
  </script>
</html>
`;
静态页面可以接收 window.todos 并基于它渲染 HTML,但你尚未从 KV 传入任何数据。为此,你需要做一些更改。
首先,html 变量将变为函数。该函数接收 todos 参数,填充上述代码示例中的 window.todos 变量:
const html = (todos) => `
<!doctype html>
<html>
  <!-- existing content -->
  <script>
    window.todos = ${todos}
    var todoContainer = document.querySelector("#todos")
    // ...
  <script>
</html>
`;
在 fetch 中,使用检索到的 KV 数据调用 html 函数并基于它生成 Response:
async fetch (request, env, ctx) {
  const body = html(JSON.stringify(data.todos).replace(/</g, '\\u003c'));
  return new Response(body, {
    headers: { 'Content-Type': 'text/html' },
  });
}至此,你已构建了一个从 Cloudflare KV 获取数据并基于该 Worker 渲染静态页面的 Cloudflare Worker。该静态页面读取数据并基于数据生成待办事项列表。剩余任务是从应用 UI 内部创建待办事项。你可以使用 KV API 添加待办事项——通过运行 env.TODOS.put(newData) 更新缓存。
要更新待办事项,你将在 Workers 脚本中添加第二个处理程序,设计为监听对 / 的 PUT 请求。当该 URL 收到请求体时,Worker 将新待办事项数据发送到 KV 存储。
在 fetch 中添加此新功能:如果请求方法是 PUT,它将获取请求体并更新缓存。
export default {
	async fetch(request, env, ctx) {
		const setCache = (data) => env.TODOS.put("data", data);

		if (request.method === "PUT") {
			const body = await request.text();
			try {
				JSON.parse(body);
				await setCache(body);
				return new Response(body, { status: 200 });
			} catch (err) {
				return new Response(err, { status: 500 });
			}
		}
		// previous code
	},
};
检查请求是否为 PUT 并将剩余代码包装在 try...catch 块中。首先,解析传入的请求体,确保它是 JSON,然后使用新数据更新缓存并将其返回给用户。如果出现问题,返回 500 状态码。如果路由被 PUT 以外的 HTTP 方法(如 POST 或 DELETE)访问,返回 404 错误。
使用此脚本,你现在可以为 HTML 页面添加一些动态功能以实际访问此路由。首先,为待办事项名称创建输入框和提交按钮。
const html = (todos) => `
<!doctype html>
<html>
  <!-- existing content -->
  <div>
    <input type="text" name="name" placeholder="A new todo"></input>
    <button id="create">Create</button>
  </div>
  <!-- existing script -->
</html>
`;
给定该输入和按钮,添加相应的 JavaScript 函数以监听按钮点击——点击按钮后,浏览器将 PUT 到 / 并提交待办事项。
const html = (todos) => `
<!doctype html>
<html>
  <!-- existing content -->
  <script>
    // Existing JavaScript code

    var createTodo = function() {
      var input = document.querySelector("input[name=name]")
      if (input.value.length) {
        todos = [].concat(todos, {
          id: todos.length + 1,
          name: input.value,
          completed: false,
        })
        fetch("/", {
          method: "PUT",
          body: JSON.stringify({ todos: todos }),
        })
      }
    }

    document.querySelector("#create").addEventListener("click", createTodo)
  </script>
</html>
`;
此代码更新缓存。记住 KV 缓存是最终一致的——即使你更新 Worker 从缓存读取并返回,也无法保证它实际上是最新的。相反,通过在本地更新待办事项列表——获取原始渲染待办事项列表的代码,将其变为名为 populateTodos 的可复用函数,并在页面加载和缓存请求完成时调用:
const html = (todos) => `
<!doctype html>
<html>
  <!-- existing content -->
  <script>
    var populateTodos = function() {
      var todoContainer = document.querySelector("#todos")
      todoContainer.innerHTML = null
      window.todos.forEach(todo => {
        var el = document.createElement("div")
        el.textContent = todo.name
        todoContainer.appendChild(el)
      })
    }

    populateTodos()

    var createTodo = function() {
      var input = document.querySelector("input[name=name]")
      if (input.value.length) {
        todos = [].concat(todos, {
          id: todos.length + 1,
          name: input.value,
          completed: false,
        })
        fetch("/", {
          method: "PUT",
          body: JSON.stringify({ todos: todos }),
        })
        populateTodos()
        input.value = ""
      }
    }

    document.querySelector("#create").addEventListener("click", createTodo)
  </script>
`;
客户端代码就绪后,部署新版本的功能应将所有部分整合在一起。结果是一个真正的动态待办事项列表。
待办事项列表的最后一部分是能够更新待办事项——特别是将其标记为已完成。
幸运的是,此工作的大部分基础设施已经就位。你可以更新缓存中的待办事项列表数据,如 createTodo 函数所示。更新待办事项更多是客户端任务而非 Worker 端任务。
首先,可以更新 populateTodos 函数为每个待办事项生成 div。此外,将待办事项名称移入该 div 的子元素:
const html = (todos) => `
<!doctype html>
<html>
  <!-- existing content -->
  <script>
    var populateTodos = function() {
      var todoContainer = document.querySelector("#todos")
      todoContainer.innerHTML = null
      window.todos.forEach(todo => {
        var el = document.createElement("div")
        var name = document.createElement("span")
        name.textContent = todo.name
        el.appendChild(name)
        todoContainer.appendChild(el)
      })
    }
  </script>
`;
你设计了客户端代码来处理待办事项数组并渲染 HTML 元素列表。你一直在做但尚未真正用到的一些事情——特别是 ID 的包含和更新待办事项的 completed 状态——这些很好地配合以支持在应用 UI 中更新待办事项。
首先,在 HTML 中附加每个待办事项的 ID 会很有用。这样,你可以在 JavaScript 部分引用该元素以对应数据数组中的待办事项。数据属性和 JavaScript 中对应的 dataset 方法是实现此目的的完美方式。为每个待办事项生成 div 元素时,可以为每个 div 附加名为 todo 的数据属性:
const html = (todos) => `
<!doctype html>
<html>
  <!-- existing content -->
  <script>
    var populateTodos = function() {
      var todoContainer = document.querySelector("#todos")
      todoContainer.innerHTML = null
      window.todos.forEach(todo => {
        var el = document.createElement("div")
        el.dataset.todo = todo.id

        var name = document.createElement("span")
        name.textContent = todo.name

        el.appendChild(name)
        todoContainer.appendChild(el)
      })
    }
  </script>
`;
在 HTML 中,每个待办事项的 div 现在都有附加的数据属性,如下所示:
<div data-todo="1"></div>
<div data-todo="2"></div>
现在你可以为每个待办事项元素生成复选框。此复选框对新待办事项默认为未选中,但可以在元素在窗口中渲染时标记为已选中:
const html = (todos) => `
<!doctype html>
<html>
  <!-- existing content -->
  <script>
    window.todos.forEach(todo => {
      var el = document.createElement("div")
      el.dataset.todo = todo.id

      var name = document.createElement("span")
      name.textContent = todo.name

      var checkbox = document.createElement("input")
      checkbox.type = "checkbox"
      checkbox.checked = todo.completed ? 1 : 0

      el.appendChild(checkbox)
      el.appendChild(name)
      todoContainer.appendChild(el)
    })
  </script>
`;
复选框已设置为正确反映每个待办事项的 completed 值,但在实际勾选框时还不会更新。为此,将 completeTodo 函数作为 click 事件的事件监听器附加。在函数内部,检查复选框元素,找到其父元素(待办事项 div),并使用其 todo 数据属性在数据数组中找到对应的待办事项。你可以切换 completed 状态、更新其属性并重新渲染 UI:
const html = (todos) => `
<!doctype html>
<html>
  <!-- existing content -->
  <script>
    var populateTodos = function() {
      window.todos.forEach(todo => {
        // Existing todo element set up code
        checkbox.addEventListener("click", completeTodo)
      })
    }

    var completeTodo = function(evt) {
      var checkbox = evt.target
      var todoElement = checkbox.parentNode

      var newTodoSet = [].concat(window.todos)
      var todo = newTodoSet.find(t => t.id == todoElement.dataset.todo)
      todo.completed = !todo.completed
      todos = newTodoSet
      updateTodos()
    }
  </script>
`;
代码的最终结果是一个检查 todos 变量、用该值更新 Cloudflare KV 缓存、然后基于本地数据重新渲染 UI 的系统。
完成本教程后,你已构建了一个由 Workers 和 Workers KV 透明驱动的静态 HTML、CSS 和 JavaScript 应用,充分利用 Cloudflare 全球网络。
如果想继续改进项目,可以实现更好的设计(可参考 todos.signalnerve.workers.dev ↗ 上的在线版本),或进一步改进安全性和速度。
你可能还想添加用户特定的缓存。目前,缓存键始终是 data——这意味着网站的任何访问者都将与其他访问者共享相同的待办事项列表。在 Worker 中,你可以使用客户端请求中的值创建和维护用户特定的列表。例如,你可以基于请求 IP 生成缓存键:
export default {
	async fetch(request, env, ctx) {
		const defaultData = {
			todos: [
				{
					id: 1,
					name: "Finish the Cloudflare Workers blog post",
					completed: false,
				},
			],
		};
		const setCache = (key, data) => env.TODOS.put(key, data);
		const getCache = (key) => env.TODOS.get(key);

		const ip = request.headers.get("CF-Connecting-IP");
		const myKey = `data-${ip}`;

		if (request.method === "PUT") {
			const body = await request.text();
			try {
				JSON.parse(body);
				await setCache(myKey, body);
				return new Response(body, { status: 200 });
			} catch (err) {
				return new Response(err, { status: 500 });
			}
		}

		let data;

		const cache = await getCache();
		if (!cache) {
			await setCache(myKey, JSON.stringify(defaultData));
			data = defaultData;
		} else {
			data = JSON.parse(cache);
		}

		const body = html(JSON.stringify(data.todos).replace(/</g, "\\u003c"));

		return new Response(body, {
			headers: {
				"Content-Type": "text/html",
			},
		});
	},
};
进行这些更改并再次部署 Worker 后,你的待办事项列表应用现在包含按用户区分的功能,同时仍充分利用 Cloudflare 全球网络。
Worker 脚本的最终版本应如下所示:
const html = (todos) => `
<!DOCTYPE html>
<html>
  <head>
    <meta charset="UTF-8">
    <meta name="viewport" content="width=device-width,initial-scale=1">
    <title>Todos</title>
    <link href="https://cdn.jsdelivr.net/npm/tailwindcss/dist/tailwind.min.css" rel="stylesheet"></link>
  </head>

  <body class="bg-blue-100">
    <div class="w-full h-full flex content-center justify-center mt-8">
      <div class="bg-white shadow-md rounded px-8 pt-6 py-8 mb-4">
        <h1 class="block text-grey-800 text-md font-bold mb-2">Todos</h1>
        <div class="flex">
          <input class="shadow appearance-none border rounded w-full py-2 px-3 text-grey-800 leading-tight focus:outline-none focus:shadow-outline" type="text" name="name" placeholder="A new todo"></input>
          <button class="bg-blue-500 hover:bg-blue-800 text-white font-bold ml-2 py-2 px-4 rounded focus:outline-none focus:shadow-outline" id="create" type="submit">Create</button>
        </div>
        <div class="mt-4" id="todos"></div>
      </div>
    </div>
  </body>

  <script>
    window.todos = ${todos}

    var updateTodos = function() {
      fetch("/", { method: "PUT", body: JSON.stringify({ todos: window.todos }) })
      populateTodos()
    }

    var completeTodo = function(evt) {
      var checkbox = evt.target
      var todoElement = checkbox.parentNode
      var newTodoSet = [].concat(window.todos)
      var todo = newTodoSet.find(t => t.id == todoElement.dataset.todo)
      todo.completed = !todo.completed
      window.todos = newTodoSet
      updateTodos()
    }

    var populateTodos = function() {
      var todoContainer = document.querySelector("#todos")
      todoContainer.innerHTML = null

      window.todos.forEach(todo => {
        var el = document.createElement("div")
        el.className = "border-t py-4"
        el.dataset.todo = todo.id

        var name = document.createElement("span")
        name.className = todo.completed ? "line-through" : ""
        name.textContent = todo.name

        var checkbox = document.createElement("input")
        checkbox.className = "mx-4"
        checkbox.type = "checkbox"
        checkbox.checked = todo.completed ? 1 : 0
        checkbox.addEventListener("click", completeTodo)

        el.appendChild(checkbox)
        el.appendChild(name)
        todoContainer.appendChild(el)
      })
    }

    populateTodos()

    var createTodo = function() {
      var input = document.querySelector("input[name=name]")
      if (input.value.length) {
        window.todos = [].concat(todos, { id: window.todos.length + 1, name: input.value, completed: false })
        input.value = ""
        updateTodos()
      }
    }

    document.querySelector("#create").addEventListener("click", createTodo)
  </script>
</html>
`;

export default {
	async fetch(request, env, ctx) {
		const defaultData = {
			todos: [
				{
					id: 1,
					name: "Finish the Cloudflare Workers blog post",
					completed: false,
				},
			],
		};
		const setCache = (key, data) => env.TODOS.put(key, data);
		const getCache = (key) => env.TODOS.get(key);

		const ip = request.headers.get("CF-Connecting-IP");
		const myKey = `data-${ip}`;

		if (request.method === "PUT") {
			const body = await request.text();
			try {
				JSON.parse(body);
				await setCache(myKey, body);
				return new Response(body, { status: 200 });
			} catch (err) {
				return new Response(err, { status: 500 });
			}
		}

		let data;

		const cache = await getCache();
		if (!cache) {
			await setCache(myKey, JSON.stringify(defaultData));
			data = defaultData;
		} else {
			data = JSON.parse(cache);
		}

		const body = html(JSON.stringify(data.todos).replace(/</g, "\\u003c"));

		return new Response(body, {
			headers: {
				"Content-Type": "text/html",
			},
		});
	},
};
你可以在 GitHub ↗ 上找到此项目的源代码以及带部署说明的 README。